Perfmatters is a lightweight performance plugin for WordPress that helps to speed up your website by disabling unnecessary features and scripts. In this tutorial, we’ll go over how to set up and configure Perfmatters to optimize your WordPress site’s performance.
Step 1: Install Perfmatters
To get started with Perfmatters, you’ll need to install the plugin on your WordPress site. There are two ways to do this:
- From your WordPress dashboard, go to Plugins > Add New and search for “Perfmatters.” When you find the plugin, click the “Install Now” button and then activate the plugin.
- Download the Perfmatters plugin from the WordPress plugin repository and then upload it to your site by going to Plugins > Add New > Upload Plugin.
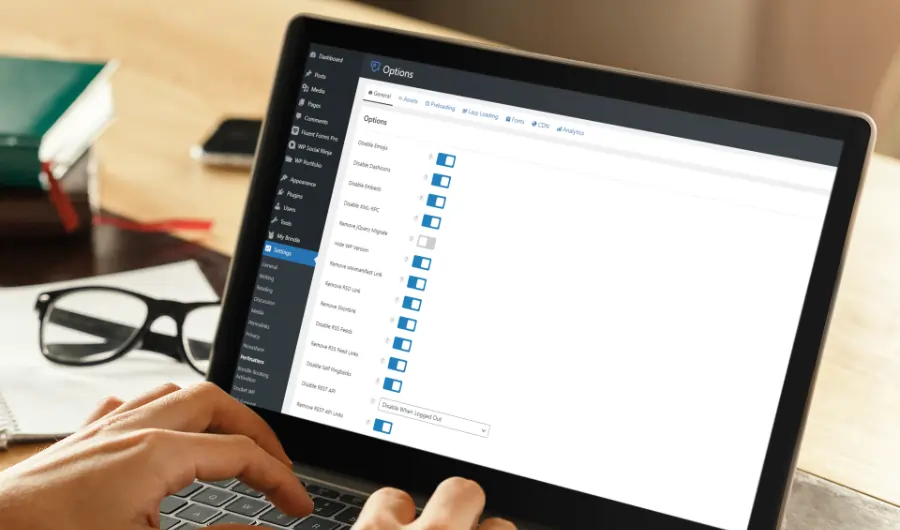
Step 2: Configure General Settings
Once you’ve installed and activated Perfmatters, you’ll need to configure the general settings. To do this, go to Settings > Perfmatters in your WordPress dashboard.
On the General Settings page, you’ll see options for disabling certain features and scripts. For example, you can disable pingbacks and trackbacks, the WordPress REST API, and the emojis script.
You’ll also see options for disabling certain WordPress features on specific pages or post types. For example, you can disable the WordPress post revision system or the WordPress heartbeat API on certain pages or post types to reduce server load.
Step 3: Configure Script Manager
The Script Manager is a powerful feature of Perfmatters that allows you to selectively disable or enable scripts on your WordPress site. This can help to reduce server load and improve performance.
To access the Script Manager, go to Settings > Perfmatters > Script Manager in your WordPress dashboard. From here, you can see a list of all the scripts that are being loaded on your site. You can then selectively disable or enable specific scripts as needed.
For example, if you’re using a plugin that loads a script on every page of your site, but you only need the script on a few specific pages, you can use the Script Manager to disable the script on all pages except the ones where it’s needed. This can help to reduce server load and improve performance.
Step 4: Configure Database Cleanup
The Database Cleanup feature of Perfmatters allows you to optimize your WordPress database by deleting unnecessary data. This can help to reduce the size of your database and improve performance.
To access the Database Cleanup feature, go to Settings > Perfmatters > Database Cleanup in your WordPress dashboard. From here, you can see a list of all the data that can be deleted from your database. You can then selectively delete data as needed.
Be careful when using the Database Cleanup feature, as deleting certain data may cause issues with your site. It’s recommended to create a database backup before making any changes.
By following the steps outlined in this tutorial, you should now be able to set up and configure Perfmatters to optimize the performance of your WordPress site. By disabling unnecessary features and scripts and optimizing your database, you can improve your site’s load time and overall performance.
I am a freelance web designer and developer located in Oshawa, ON. I have been involved in website design since 1998. I specialize in SEO for local businesses, and I am committed to helping my clients outrank their competition.